Today - 27 May 2025
Now - 22:23:10
Now - 22:23:10
Preparation: When origami peacock modules, first read the Chinese technique of making paper models that resemble the elements of a normal constructor. Prepare rectangles of colored paper, this long side of the A4 sheet can be divided into eight different parts, and the short side of the sheet is sufficient to divide the whole into four parts. Ascertive sheet into rectangles with a simple pencil and ruler, you can then cut along the lines. In the end you'll have rectangles of size 37×53 mm, from which you want to collect as many modules. To make modular origami peacock looked very unusual use for making DIY colored paper several contrasting colors.
Creating modules: Collecting origami peacock modules, you must first deal with the addition of colored rectangles into a triangular module. The rectangle is folded in half, was going to his middle, then bent the edges towards the center, after which the module should turn on and lift the edges up. At the top you'll see a large triangle, and the bottom corners of the wrap through it, and the result is a module with two pockets and two corners.
The modules: Create origami of the modules peacock starts with the Assembly of the paper modules to each other, and such items for unusual crafts are attached without glue, and the area of one triangle is inserted into the pocket other details of the product. While it is easiest to collect the peacock paper on the final scheme, you can apply your own imagination, changing the shape of the tail of a bird, or using the most unusual ornament. Collecting origami peacock, start with the base of the tail birds, for which you will need to use paper 28 modules. The tail should resemble a huge crown, and during its Assembly, it is desirable to use modules of three to four shades-white, green, yellow and bright pink colors.
Recommended

The rating icons in silver. Assessment of ancient icons photo
The Old Orthodox icons are of great interest to collectors worldwide. It is not only the object of aesthetic and spiritual enjoyment. Old icons are a win-win investment. As a special kind of antique, these are highly appreciated in the market, and th...

So you want to be different! So you want to be irresistible! So you want to see on the figure admiring glances and hear behind rapturous sighs. Although rare, a woman openly admits it. and don't! You just need to tie swimsuit crochet, so&hellip...
Artistic gymnasts, for whom sport – this is life, the lion's share of time to devote to training and participation in competitions. During this period, they manage to demolish more than a dozen gymnastics leotards. So mom young athletes are con...
The Most simple origami modules peacock you will be able to do this if your bird's tail will not be a one-piece construction in the form of a fan, and to gather from several strips of paper collected between modules. But if you already have not bad mastered the technique of creating origami from a “Chinese” triangles, you can make a more interesting paper peacock.
Because the beauty of the crafts depends on the brightness and shape of the tail of the “Paradise” the birds, start the Assembly of this element with the creation of the white triangles of the curved part. From the base you need to lay a couple of rows of paper parts, and then individually going three triangular element, outwardly simulating the color of the feathers to a peacock's tail, and such details are carefully inserted into the assembled base of the tail and carefully fixed.
30 color modules it will take to build the body of a bird, for this the triangles are laid out in six rows in a circle, and then eleven modules going breast paper birds. To the breast of a peacock was careful and gradually moved into the neck, in each subsequent row, you must use one color module less than was used in the previous row.
The Neck of the peacock consists of twelve rows of Chinese triangles, and in each row you can use all three parts – one green and two yellow triangle. When the neck of a bird of Paradise collected enough to attach a peacock, the beak of a small modular element red. The tail is attached to a nearly finished paper crafts in the last instance, if desired, it can be attached with glue, however, properly assembled origami would be great to stay and without any bonding materials.
Article in other languages:
AR: https://tostpost.com/ar/hobby/17159-create-origami-peacock-modules-independently.html
BE: https://tostpost.com/be/hob/33077-stvaraem-arygam-z-modulya-pa-l-n-samastoyna.html
DE: https://tostpost.com/de/hobby/32747-erstellen-origami-pfau-aus-modulen-selbst.html
HI: https://tostpost.com/hi/hobby/18773-origami.html
JA: https://tostpost.com/ja/hobby/16815-create-origami-peacock-modules-independently.html
KK: https://tostpost.com/kk/hobbi/33404-sozdaem-origami-iz-moduley-pavlin-derbes.html
PL: https://tostpost.com/pl/hobby/34450-tworzymy-origami-z-modu-w-paw-samodzielnie.html
PT: https://tostpost.com/pt/hobby/34247-criamos-origami-a-partir-de-m-dulos-de-auto-pav-o.html
TR: https://tostpost.com/tr/hobi/29828-olu-turmak-origami-mod-lleri-peacock-kendi.html
UK: https://tostpost.com/uk/hob/33598-stvoryu-mo-or-gam-z-modul-v-pavich-samost-yno.html
ZH: https://tostpost.com/zh/hobby/8341-create-origami-peacock-modules-independently.html

Alin Trodden - author of the article, editor
"Hi, I'm Alin Trodden. I write texts, read books, and look for impressions. And I'm not bad at telling you about it. I am always happy to participate in interesting projects."
Related News

A-line skirt: pattern. How to sew a-line skirt?
the a-line Skirt as such is known since the sixties of the last century, it is a silhouette, a fitted waist and slightly flared. This style was destined to be a huge success, turning existing ideas about fashion, and not to lose t...

Peplum dresses: sewing patterns for home sewing
Women of different shapes always try to show only their best features and hide minor imperfections under the well-matched clothing. However, more and more ladies are doing wrong, hiding your settings under baggy shirts, oversized ...
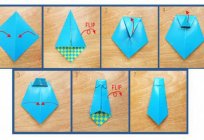
How to make an origami bow tie with a shirt: a master class
a Gift made with your own hands - what could be better? In particular, such a pleasant surprises to dear people. Paper tie origami with tiny whimsical shirt will be a great gift for father's Day or birthday of a brother or grandfa...
Nolik and Simka: make costumes fixico their hands
In 2010, the young audience got acquainted with unusual people living in each apartment, - fixies. Cartoon about these creatures spoke to the children about how toothbrush why discs, stained with jam, not working, how did cartoons...

Tulip of paper with their hands
Origami – is the ancient decorative art of folding of various figures from paper. It has roots in Ancient China where, strictly speaking, paper was invented. There are many origami patterns, which allow you to construct a va...
How to make crafts out of fuzzy wire
In the modern world child development is given special attention. This is not surprising because volatile and growing the world dictates the conditions.Now swimming lessons with babies can surprise only our grandparents. And what ...


Comments (0)
This article has no comment, be the first!