Today - 26 March 2025
Now - 12:49:19
Now - 12:49:19
Perhaps no surprise statement that almost every job seems difficult exactly as long as it does not begin to do. Later, looking back, I can only laugh at their own experiences. A striking example is the electrical work around the house. So, if you need to perform the installation of the one-button switch, a resort to services of specialized firms and masters-singles, requesting payment in the amount of 250 rubles and above. In fact the task is quite simple and easily solved on their own.
Any switch consists of a metal framework comprising a mechanism that hides his decorative plates and keys.
Depending on the number of switched circuits, there are one-, two -, and three buttons solutions. Installation of one-button switch runs the template, so it is enough to read about it or once to observe the work of a specialist. Depending on the method of installation and degree of protection of housing, there are internal and external switches. The first involves placing inside the wall, in a special box, and the second - directly on the surface of any ground. For example, editing one-button external switch expedient where it is not shown special requirements to the appearance or there is no way to install the inner box.
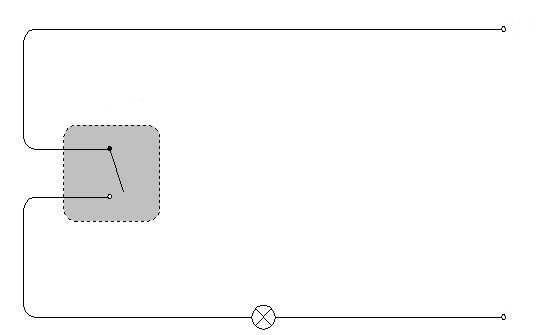
The implementation of electrical circuits, as a rule, identical. At the heart of these devices - metal plate rocker, able to connect two copper contact, a bridge, forming an electrical circuit. When enabled, the switch passes through a current, allowing the connected tool to operate.
Recommended

The most effective methods of seed germination
Despite the fact that the method of seedling in vegetable production is a very time consuming process, it is used by most gardeners. Planting seeds in open ground is an easy and convenient method, but it is effective only in certain climatic zones. I...

Retro-reflective paint. The scope of
When the vehicle began to fill the road, their popularity began to gain reflective paint. Thanks to this paint, as drivers and pedestrians becomes much easier to avoid accidents in the dark. Purpose paint Reflective paint – paint material, whic...

How to make icon with your own hands - options izgotovleniya (simple and complex)
In Soviet times, many collecting badges, emblems, pennants. To get them was not easy. And today, thanks to technology, you can make them yourself. Knowing how to make icon with your own hands, and you can make original gifts to your friends, and make...
Accordingly, in the off state, the internal resistance of the air gap between the pin and plate such that the circuit turns out is broken. The plastic key just controls the position of the elements of the mechanism. There is a modification in which instead of plates used the copper “tongue” and a system of spring-loaded rods, but the principle is unchanged.
Exception e-modification, in which the process of current flow controls the simple scheme (response to light, sound, smooth control).
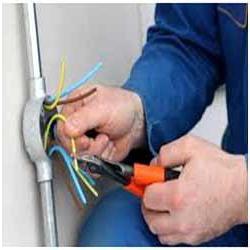
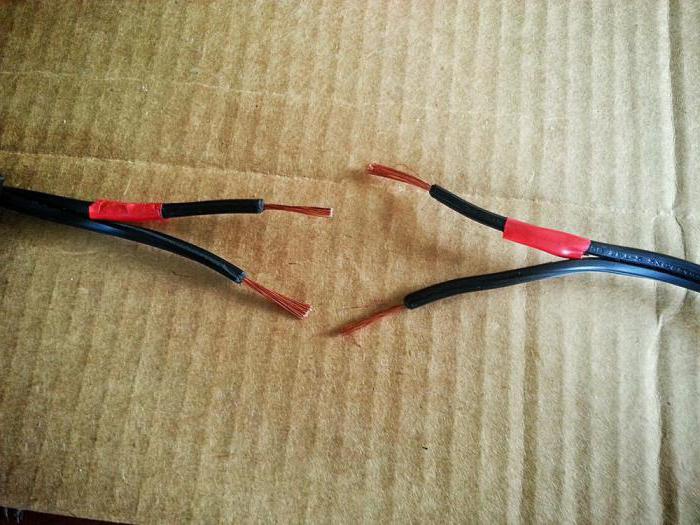
The Work starts with the determination of the place of future installation and preparation materials tools. Will need: voltage tester/phase indicator and multimeter to check continuity; duct tape; a few small screwdrivers of different types; a set of fasteners for installation; wire. 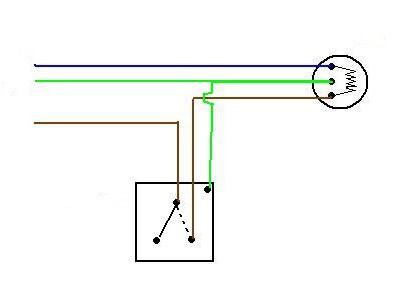 And this is only the Essentials – a full list can be formed directly before installation. The wire preferably used is copper. Adaptor-terminals are also valid. Inside the junction box, the switch should be the small stock wires.
Consider how the installation is carried out one-button external switch. Instruction is often delivered with the product in a small pamphlet or the inside of the hull is glued sticker is a hint. Although most often it is not needed, it is recommended to familiarize yourself with its contents.
Connection to the mains is performed with the removal of voltage (machines turned off). This is required to neglect which should not be.
If the transaction is not hidden in the wall, then by inspection you need to decide what kind it will be done supply of electricity to the switch. Otherwise, you need to first localize the point of attachment, having examined the scheme, or otherwise finding a place of passage of the line. Further, it is two wires (considered “normal” 220 volts) are cut, their ends from both sides of the strip from the insulation at a distance of about 10 mm apart. After that, the line is energized. With pointer “Contact” (will also fit checked flat screwdriver) are phase wire, and the circuit is again de-energized. In place of the slit is mounted a closing walk-through box, it starts at the two wires on three sides: the beginning and continuation lines, as well as additional branch of the switch. By the way, at this stage determines the length of extra footage. You can not use the box, and do zaizolirovali the twist, though it is a budget option.
On a dielectric base (brick) the device can be fixed directly. In all other cases, the need of a nonconductive material cut-based and already through it to install a switch on the base. The alternative is to purchase a fully closed model.
Many sources explaining how to connect a one-button switch, entirely overlooked the necessity of checking the response, with the result that switching occurs “opposite”: the lower the position of the keys corresponds to the enabled state, and the top-off. Although the operation of the device is not affected, then it may have the most dire consequences, for example, when replacing a defective lamp. Pointer “Contact”, or prosonlymultimeter operating in the mode of measuring the resistance check at what position of the mechanism the switch circuit passes the current. This corresponds to pressing the up arrow, that must be taken into account during installation.
In Other words, is the identification of the upper and lower terminals.
Installing the one-button switch with their hands, should not, without checking the trust incurred to the manufacturers designations (phase and zero), as payment for their mistake – a man's life.
The Wire on which phase comes, grows and is applied to the top contact. From the bottom plays second and is laid to lamp or any other load power. Although here we use the term “wire”, you have to understand that this may not be a single branch, and lived cable. Most often that does so.
The Passing of a load attached to the zero branch of the main chain anywhere. Nevertheless, even such a simple action as installation of one-button switch will need to be subject to certain requirements, one of which States that returning the branch must join the line in the same place, taken from the waste phase.
This makes it possible to easily perform the repair. And if the outer transaction can still trace a line by visual inspection, in the case of its omission in the wall search by “wandering” wires very difficult.
Cable track can be fixed on the wall clips, Packed in a special box or hidden in a corrugated pipe that attaches to the chain with switch neat and finished appearance while protecting the elements from accidental damage. The only thing you should pay attention to – corrugated pipe material.
It can be both for external and internal installation.
In any case, the General scheme is as follows: “the phase wire of main line – the branch at the switch-wire to the load – return of the wire to zero gilet”. Nothing complicated. Installation of one-button switch, designed for indoor installation, almost indistinguishable from the version hosted externally.
The only Differences lie in the fact that the first is drilled/cut/knocked the cylinder, the diameter of which corresponds to the dimensions of a special plastic mounting boxes. Depending on the wall material, it is one way or another there is fixed, and in it is inserted into the switch. His fixation is provided by tightening the two screws are either bred special stops or just screw the metal frame to the grooves of the box (the option for drywall).
Cabling for the internal switch, usually hidden. In the case of a concrete or brick wall is chase (groove) and cables from the main line. If the walls are something of a “covered”, the cable is stretch beyond the leaves. That is to say, should only be the switch (its key), and everything else – hidden. Consider all in more detail.
The place Chosen for a future switch. According to the EMP, the distance to gas pipes and doorways must be not less than 0.5 m. the Height is chosen individually. Previously it was thought that the installation of switches should be within arm's length of an adult of average height. Now it is recommended not to exceed 1 m (except in institutions). A special crown is drilled round, but the cylinder stands out. To him from the place of connection to the line “stretch” the groove depth of not less than 10 mm.

The easiest way to perform special chasers, two cutting edges which simultaneously create parallel recesses. Although in the absence of the special tool it is possible to do the usual chisel and hammer.
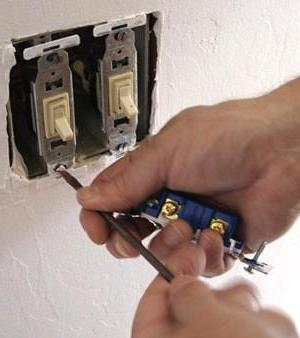
Secure the frame in the brick Foundation with the help of cement. First, she gently fixed with plaster or any other similar composition. To her stroebe supplied cable and in the same manner held there. After curing, proceed to the installation of the switch.First, it is removed from the press and focus on the provisions of the “on/off" (discussed earlier). Wires stripped and connected to the contacts. Proceed to the smearing in the wall only after you have verified the entire chain. By the way, editing one-button switch Werkel, as products of some other manufacturers simplified, as in their design instead of the locking wire self-locking bolts applied solutions.
Depending on the design features, the inner holding tongues can be a thin elastic band. To remove it is not required, since thanks to her, the reeds are pressed against the “body”, making it easy to get it in the junction box. The metal plate forming the basis of the switch should be as close as possible to approach the wall, as even a slight 1-3mm gap at final Assembly “evolve” in a quite noticeable curvature. So improper installation one-button switch Schneider belonging to the group of very high-quality products, canto reduce on the “no” all of its advantages. And it won't matter how long the plastic will keep the appearance.
Covered With something the walls the problem is simplified in several times. Perhaps, its implementation becomes more complicated than in the case of mounting an external switch.
In the sheet crown cut a circle and installed in this box.
Its design is such as to dispense with the holding of solutions, although there are screws for additional fixation. From the junction box (usually near the ceiling) with the sheet pulled the cable to the installation location of the switch, and from there-to the load. Installation (search phase wire, orienteering, joining the terminals and housing Assembly). The only thing you should pay attention, installing the one-button switch Viko and his ilk producers: it is recommended that the plate design is additionally screwed to the box with screws. Such modifications are available in stores in large quantity.
Article in other languages:
KK: https://tostpost.com/kk/domashniy-uyut/2480-montazhdau-odnoklavishnogo-azhyrat-ysh-z-olymen.html
PL: https://tostpost.com/pl/komfort-domu/2483-monta-odnoklavishnogo-wy-cznika-w-asnymi-r-kami.html
TR: https://tostpost.com/tr/domashniy-uyut/2485-montaj-odnoklavishnogo-anahtar-kendi-elleriyle.html

Alin Trodden - author of the article, editor
"Hi, I'm Alin Trodden. I write texts, read books, and look for impressions. And I'm not bad at telling you about it. I am always happy to participate in interesting projects."
Related News

Exterior paint for the exterior: how to choose? Types of exterior paints: specifications
to paint a new home or to update the facade of the old, not necessarily to invite a team of professionals. Enough to make a few correct steps and have the respective tool – and the beauty of the home can give yourself. This ...

Reverse hammer against the dents on your car
the repair shop that performs auto body shops always have a range of tools and equipment for repair of dents without painting and straightening metal. Although seriously damaged, and even on a large area without the use of stocks ...

How to choose flowers for the stand? What kind of require flowers in pots
Any beautiful and cozy room has the ability to inspire people. And the best natural decoration is flowers. They bring home a sense of peace and tranquility, relieves irritation and fatigue. How to harmoniously place the flowersa R...

The correct calculation of lighting – beautiful yard
Properly lighting private yard – the key to its beauty and versatility at any time of the day. Often modern areas are equipped not only with beds, shrubs and other plantings of cultivated plants, but all sorts of sculptures,...

How to wash stretch ceilings? How to clean glossy stretch ceiling?
the Desire for a stylish beauty in the regeneration of offices, ballrooms, restaurant rooms and other public facilities gave rise to such an innovation in interior decoration, as the suspended ceiling. Moreover, this kind of ceili...

Apple "strapling": a description of high-yielding varieties
a Variety of Apple "strafing" came to us from the Baltic States. If the plant is in conditions of high humidity of air and soil, it reduces the size of the fruit, so in dry times it needs abundant and frequent watering. In additio...


Comments (0)
This article has no comment, be the first!