Today - 16 April 2025
Now - 08:20:32
Now - 08:20:32
The Cranes – majestic birds that remain faithful to their partner for life. It is therefore not surprising existence giving that the Japanese crane symbolizes longevity and happy life. And the Japanese believe that when you put a thousand birds will come true deepest desire. Perhaps because of this, crane – one of the most popular types of origami in Japan, which has spread around the world.
We Offer you several workshops to learn how to make cranes in origami. Perhaps your wish will come true.
Japanese Manufactured cranes from paper. It can be any of:
Size also can be any. But for beginners it is better to choose paper that is medium in size, because of the small leaf will be difficult to lay down the details of the crafts, and with too much would not be very convenient to operate.

If you used plain paper and want to decorate the finished crafts, then you may need markers (markers), glitter glue, paint and other jewelry designed for decoration paper products.
If you don't have a square sheet of paper, take any and give it a shape.
1st method:
2nd method (if the sheet is rectangular),
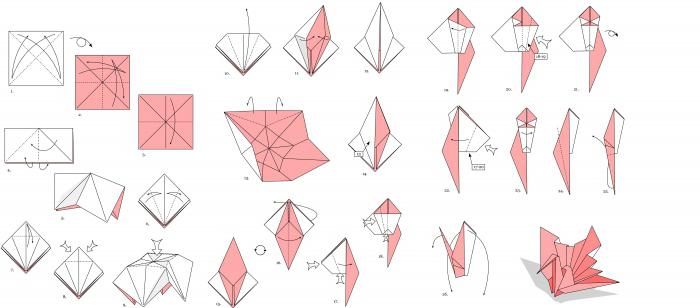
Let's see how to make a Japanese crane: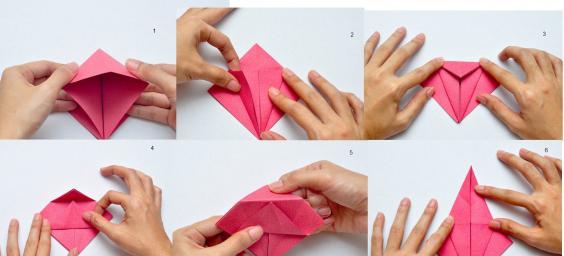
Half the work is done.
Recommended
The rating icons in silver. Assessment of ancient icons photo
The Old Orthodox icons are of great interest to collectors worldwide. It is not only the object of aesthetic and spiritual enjoyment. Old icons are a win-win investment. As a special kind of antique, these are highly appreciated in the market, and th...

So you want to be different! So you want to be irresistible! So you want to see on the figure admiring glances and hear behind rapturous sighs. Although rare, a woman openly admits it. and don't! You just need to tie swimsuit crochet, so&hellip...
Artistic gymnasts, for whom sport – this is life, the lion's share of time to devote to training and participation in competitions. During this period, they manage to demolish more than a dozen gymnastics leotards. So mom young athletes are con...
The Master-class "How to make cranes origami", continued:
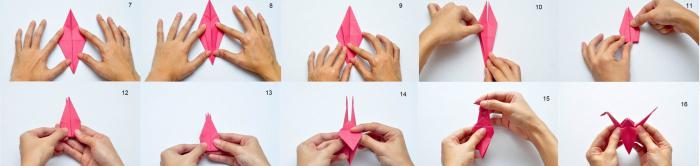
You have made flat the Japanese crane.
The Master class "Volumetric Japanese crane" (a photo of the finished work is below):
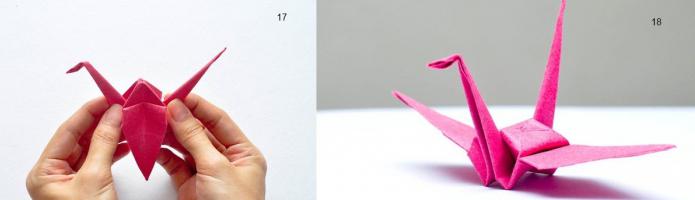
Surround Japanese crane-origami ready (figure 18).
If you want to make a truly original gift, make crafts Japanese origami crane with a fluffy tail. This paper bird will surprise and delight any. It will be a source of inspiration. An origami crane (diagram with step-by-stepinstruction is below) is a masterpiece.
Paper bird can get the original, if you do not only a magnificent tail, and wings.
The Master-class on making pie with lush wings:
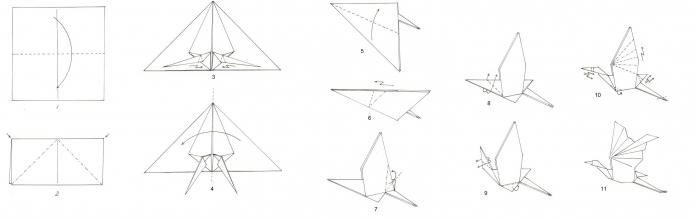
A Japanese crane with lush wings ready!
Origami "Japanese crane" – is not just an interesting hack, but the original decoration.
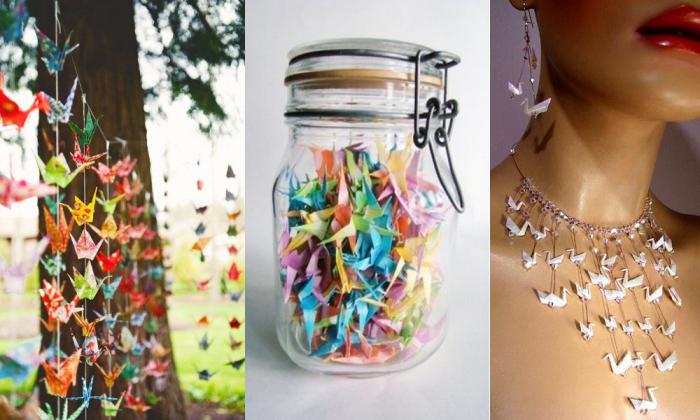
Of the dozen or more paper cranes you can make a garland on the wall or a chandelier, decorations, paintings. And if you make lots of little crafts and put them in a transparent jar or vase, you get a great decor element, which will give your dwelling a touch of personality.
Garland, by the way, you can do very different:
To make a garland, you will need thread or fishing line. Pierce just inside the paper with a needle and thread through the hole thread (fishing line). And so every hack. Then either connect all of the cranes into one, or attach on a separate thread or stick (the ledge).
Exercise your imagination and look for inspiration.
Do Japanese cranes-origami with the children or your friends. This is a very interesting and exciting experience!
Article in other languages:
AR: https://tostpost.com/ar/hobby/9496-japanese-crane-made-of-paper.html
BE: https://tostpost.com/be/hob/17040-yaponsk-zhuravel-z-papery.html
DE: https://tostpost.com/de/hobby/17051-japanisch-kranich-aus-papier.html
ES: https://tostpost.com/es/la-afici-n/17063-japon-s-la-grulla-de-papel.html
HI: https://tostpost.com/hi/hobby/9502-japanese-crane-made-of-paper.html
JA: https://tostpost.com/ja/hobby/9502-japanese-crane-made-of-paper.html
KK: https://tostpost.com/kk/hobbi/17038-zhapon-a-azdan-tyrna.html
PL: https://tostpost.com/pl/hobby/17019-japo-ski-uraw-z-papieru.html
PT: https://tostpost.com/pt/hobby/17018-japon-s-o-grou-de-papel.html
TR: https://tostpost.com/tr/hobi/17047-japon-ka-t-turna.html
UK: https://tostpost.com/uk/hob/17037-yapons-kiy-zhuravel-z-paperu.html
ZH: https://tostpost.com/zh/hobby/10367-japanese-crane-made-of-paper.html

Alin Trodden - author of the article, editor
"Hi, I'm Alin Trodden. I write texts, read books, and look for impressions. And I'm not bad at telling you about it. I am always happy to participate in interesting projects."
Related News
Crafts for dolls with their own hands
All girls play with dolls. These toys are among the first in the nursery, not in a hurry to leave them Teens, and sometimes even fully grown ladies. The dolls in the market today you can find various accessories, furniture and ent...
The big puzzle: how many parts, how to assemble. Complex puzzles
Puzzles — a mosaic of the numerous details that need to connect with each other to produce a particular image. The most common are the puzzles from cardboard. The amount of detail may be different for kids are available in s...
Bayonet, German WWII: prices, photos
the Last two world wars gave the concept and experience in the manufacture and development of not only combat knives and bayonets to firearms.This experience has allowed to develop the optimum size of knife for trench or trench co...
Associated jacket for girls knitting needles and your little one the most stylish!
What mom doesn't want her daughter was the most elegant, wearing unique things, and more at anybody such was not? You can then associate the little Princess a wonderful blouse. Jacket for girl, knitting needles and mother's hands ...
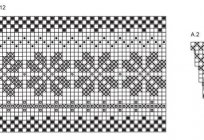
Beautiful mittens knitting (jacquard): scheme for the different sizes
Among all available accessories for winter are the hardest masters to knit mittens knitting (jacquard). Scheme, even the simplest, involve simultaneous work with threads of different colors (at least two shades).In the course of t...
Cotton is an unusual material for crafts
their hand-Made decorative items from wool, can be a wonderful masterpiece. Plus they are so simple that with little adult supervision with them to handle even a preschooler. The article presents to your attention master classes, ...


Comments (0)
This article has no comment, be the first!